
Having your new events automatically populate to your Google Calendar is an easy Zap to create and will help you stay organized!
Note: This is not retroactive and will only apply to events you created after implementing this Zap.
Note: Make sure that your Zapier, Details, and Google timezones are all set properly as this could affect the outcome of your Zap!
Trigger
- First, click the Make a Zap button.
- In the search bar, type in Details Flowers and select it as your trigger app.
- Click Updated Event and then Save + Continue.
- If you have not already connected your Details account, click here to learn how. Otherwise, it will pull up your Details account - click Save + Continue.
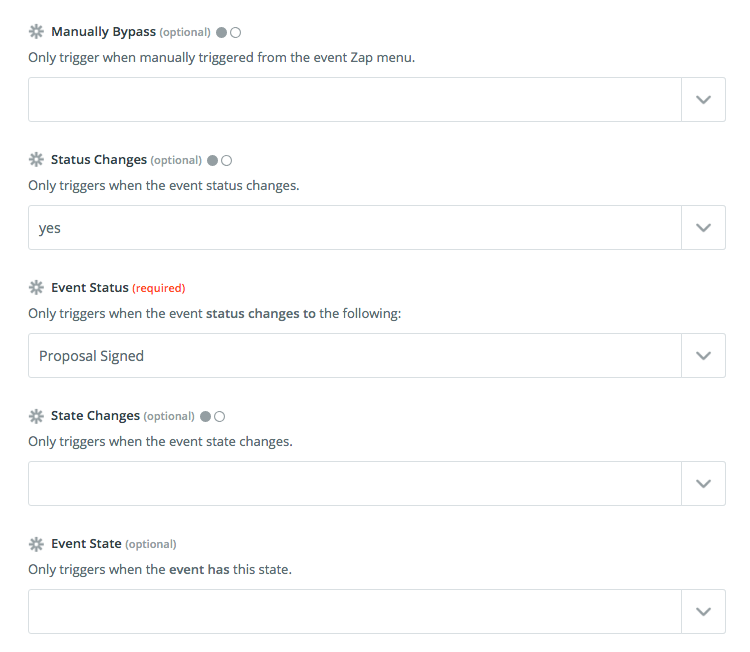
Here on the Edit Options step of setting up your trigger is where you get to customize this Zap to your specific need. You'll need to decide what causes your event to update to the calendar, and it's primarily driven by two things: state and status.
Since this is where you'll customize your Zap, this is also where things become pretty open-ended. To help you understand how this will work, we'll go through an example of one of the many ways you can set this particular Zap up. For this example, we're going to set it up to add the event to our Google Calendar when a proposal has been signed and accepted, but you are welcome to choose a different status.
- Start by using the drop-down menu under Status Changes to select Yes - you will then be required to select an Event Status for the trigger to look for in order to activate.
- Use the drop-down menu under Event Status to select a status of Proposal Signed.
- Click the Continue.
- A sample will be pulled in from Details and automatically selected. Click Continue to complete the trigger portion of this Zap.
Action
- Choose Google Calendar as your action app.
- Select Create Detailed Event from the available options and then continue. You can use the 'Quick Add Event' if you'd like, but we've found that you'll get more control with the detailed option and it requires less knowledge of custom values and how to string them together.
- If you haven't done so in your Zapier account before, connect your Google account and continue.
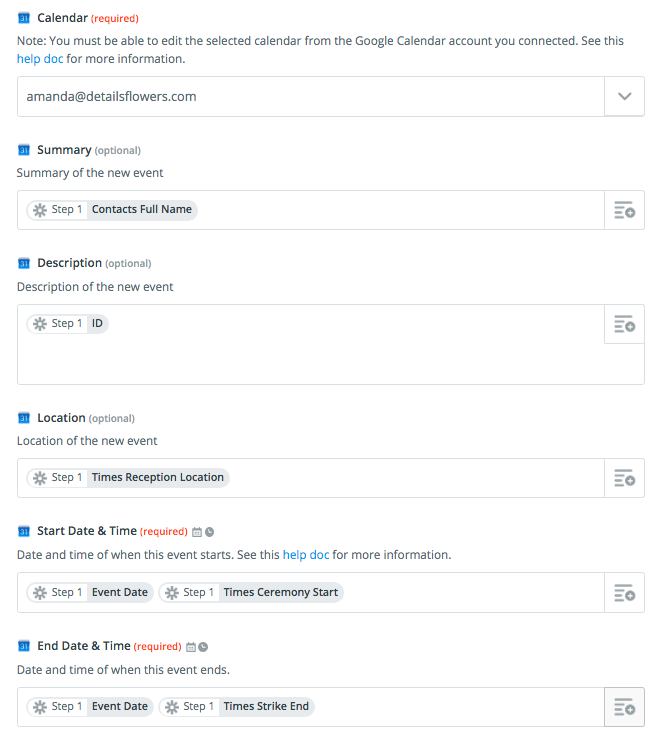
- There are three required fields for an event to be added to your Google Calendar: Calendar (i.e. Family, Business, Contacts, etc), Start Date & Time, and End Date & Time.
This is another area where you are customizing the Zap and the options are quite broad. We'll walk you through some of the steps we think will be most useful, but it's largely up to you to decide how you want this to work!
- For Calendar, select the desired calendar.
- For the Start Date & Time, you'll need to use the drop-down menu to select two values - one for the date and one for the time.
Note: Values are placeholders for the data points being pulled through Zapier.
- To select the date, use the drop-down menu and locate the value titled Event Date.
- To select the time, use the drop-down menu and locate the value titled Times Setup Available or pick from one of the other options, such as Ceremony Start Time.
- Be sure to put a space between these two values. This is very important!
- Repeat the steps for the End Date & Time, using the same value for the date and choosing the Times Strike End value for the end time. Again, be sure to put a space between the two values.
Now that you've got the only required fields set up, the rest is up to you! We'll give you a few more suggested fields and corresponding values to consider, but they are entirely optional. Here are some to consider:
- Summary: Use value Event Name
- Description: Use value Event ID if you plan on setting up other calendar Zaps. Otherwise, you're welcome to pick whatever you like from the available options.
- Location: Use value Times Reception Location
Lower down you'll see some options to set reminder defaults and you can absolutely use those to set some personal preferences, too!
Once you've finished setting up all your template options, you can click 'Continue' to move on to the next page where you'll be prompted to test out your Zap. Now that you've set up your trigger and action, you'll be able to run a test to send event data to your Google Calendar. Verify that the location has been properly input into your calendar and then click 'Finish' to move on to the final page.
All that's left to do is to enable your Zap. Do so by clicking the switch to the On position and Zap away!