
There is a variety of sections that you can add to your 'Worksheet' to help you build out your event. To add a section to your 'Worksheet,' click the 'Menu' button in the upper right-hand corner of the 'Design Board' and select 'Edit Worksheet.' Once the 'Worksheet Options' appear, you will drag and drop the section onto your 'Worksheet!'
-3.gif?width=670&name=ezgif.com-video-to-gif%20(6)-3.gif)
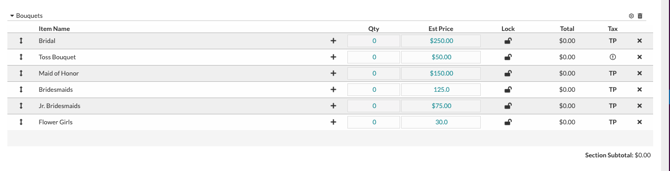
- Category Group: Category groups are used for housing your event arrangements, such as a 'Bouquets' section or a 'Boutonnieres' section. These sections are very versatile in their uses, as you can customize the name of the sections to fit your needs!
- Tables & Seating: This section will list the number of guests, the number of tables, the number of guests per table, and if there will be a 'Head Table' and 'Sweetheart' table present.

- Color Palette: The color palette will allow you to input the color scheme for the event. The color story is a very important part of the client's vision and will help make their vision come to life. You can select colors by hue or shade using the color palette, by Hex or Pantone code to ensure that exact match, or from an image provided by the client. You will also be able to see recommendations for complementary colors, shades, tints, and more! Have a color you are using over and over again? (Blush, we're looking at you!) Save it to your 'Favorites' to easily grab it over and over again or create a color collection for that color theme.

- Discounts: At times, you may want to offer your client a discount on their event. When using the discounts section, you will first want to decide what you would like the discount applied to, products, services, labor, event (before taxes), or total (after taxes). You can also choose if you want the discount applied evenly between taxable and non-taxable items, taxable first or non-taxable first. The final step will be to choose if you would like your discount to be a flat amount or a percentage and input the amount.

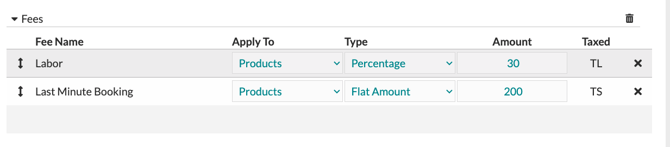
- Fees: The 'Fees' section allows you to add any additional fees to your events, such as a 'Delivery' fee or a 'Labor' fee. You can choose if you would like your fee to be applied to your products, services, or labor and if you would like your fee to be an amount or a percentage.
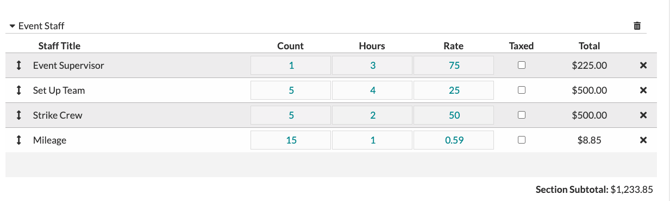
- Staff & Labor: The 'Staff & Labor' section will allow you to keep track of the staff needed for the event, the amount they are paid per hour, how many hours they will be working, and if this will be taxed.
- Taxes: This is arguably the most important part of the 'Worksheet,' ensuring your tax percentages are correct! Here, you will put in the tax rate in your area for products, labor, and services. This section will determine what tax rate is charged for each line within your sections when selecting either 'TP,' 'TL,' or 'TS.'

If you see a box pop up like the one shown below, this means that you currently don't have the 'Taxes' section on your Worksheet & your default tax rate is set at the defaults provided by Details of 6.5%.

You can click the 'Save Anyway' option if you would like to keep your Worksheet & Tax as is, or you can exit the box and add the Taxes section back to your Worksheet to edit.
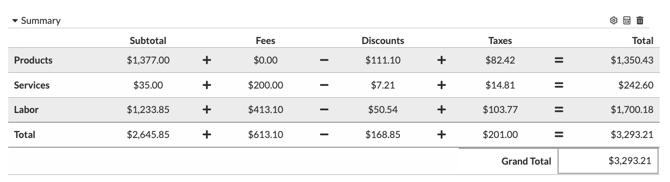
- Summary: The 'Summary' section is just that, a summary! This will show you the breakdown of the event cost showing you how you got to your grand total. The first column is the 'Subtotal' column. Items marked as TP will show in the products subtotal, items marked as TL will show in the labor subtotal, and items marked as TS will show in the services subtotal. Any fees you listed in the 'Fees' section will show in the fees column, and any discounts you listed in the 'Discounts' section will show in the discounts column. The taxes will be charged based on the percentage you set in your 'Taxes' section for products, labor, and services.
Note: To learn more about the 'Worksheet,' watch the full walkthrough video below!