
Event Stage & Status
Events are organized into different stages of the Event Pipeline based on their status. Use the pipeline as an organizational tool to keep track of where you're at with each event!

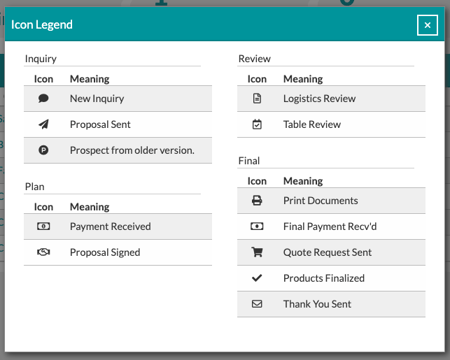
To see which event statuses apply to which stages of the pipeline, click on the map icon in the top-left corner of the event list.
Changing the Event Status
To change the status of an event, click on the status icon on the left side and select a new status for the event. Keep in mind that this will likely change the stage of the Event Pipeline that the event is in!
List Views
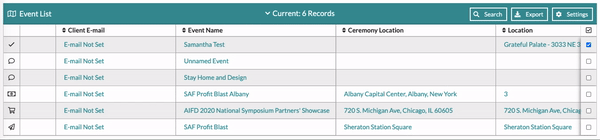
At the top-center of the Event List is the option to switch the view of events between the lists seen in the image below.
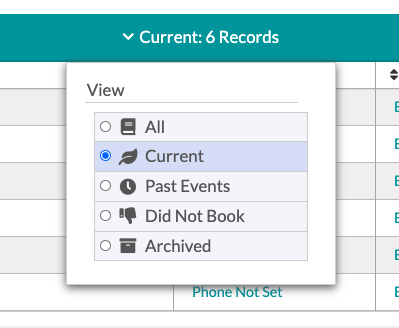
The Event List will always default to the 'Current' list, and you can navigate and move events to the various others. The 'Past Events' list will be automatically populated with events that have a past event date; the 'Did Not Book' and 'Archived' lists will be populated with events that are marked as such.
Marking Events 'Archived' or 'Did Not Book'
To move an event to either the 'Archived' or 'Did Not Book' list, click the checkbox on the right of the event and select the appropriate option at the bottom center.

Events can be returned to the 'Current' list similarly, but from the list they have been associated with. For example, you must restore an archived event from the 'Archived' list.
Searching the Event List
To search for an event or client, click the 'Search' button in the top-right corner of the list, enter the desired search terms and/or parameters, and click the 'Search' button to execute.

Did you know you can search using the 'Custom Properties' entered on the 'Details' page? You can! Click here to learn more about using 'Custom Properties'.
Exporting the Event List
To generate a document containing the information found on the Event List, click the 'Export' button in the top-right corner of the list.

The generated document will include anything in your current view of the list, whether those are past events, search results, or your list of current events; all of the information will be exported. This is also applicable to the columns of data being displayed; the export will only include the columns you've included in the view.
Adjusting the Event List Settings
There are many options to customize how your Event List is displayed and how you interact with it; the combinations are nearly endless. To start editing the settings, click the 'Settings' button in the top-right corner of the list.

A window will open in the center of the screen, displaying all of the options for customization.
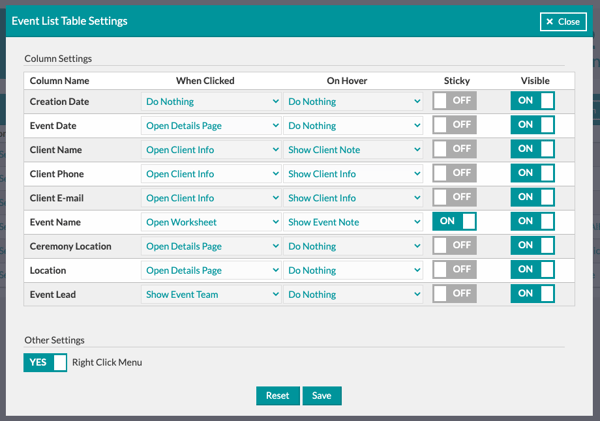
Column Name
This is the column's title and indicates what information is included.
When Clicked
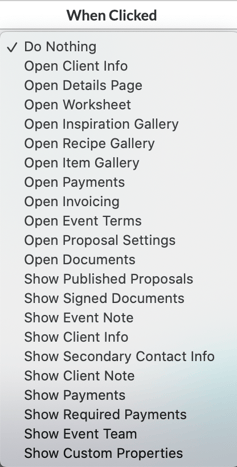
Use the drop-down menu to determine what action should occur when data within the associated column is clicked. You'll notice there are many options!
Note: There is an essential distinction between the 'Open' and 'Show' functions. If an 'Open' option is selected, the corresponding page will be opened by clicking on the associated information. If a 'Show' option is selected, a pop-up window will be displayed on the Event List without directing you to another page.
On Hover
Use the drop-down menu to determine what action should occur when the data within the associated column is hovered with the mouse.
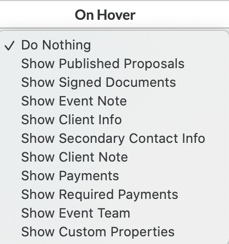
Each corresponding option will display a pop-up window on the Event List relating to the associated event.
Sticky Columns
Use the toggle switches to determine which columns should be 'sticky' or not.
If a column is sticky, it will hold its place in the list when scrolled. This means that when you scroll far enough to the right that the column would usually be hidden from view, it will instead hold its place, and the adjacent columns will scroll behind it.
Here's an example of what it looks like when scrolling with sticky columns.
Visible Columns
Use the toggle switches to determine which columns should be included in the Event List.
The Right-Click Menu
Under the 'Other Settings' section, you'll see an option to toggle the 'Right-Click Menu' on and off. The Right-Click Menu will allow you to right-click on any event column to quickly and easily navigate to various related pages for that event.
This feature makes it very easy to navigate, but it will override the default right-click options in your browser, so keep that in mind!
Saving & Resetting
Be sure to save any changes by clicking the 'Save' button at the bottom-center of the Event List Settings window!
If you get a little carried away and want to revert the Event List settings back to the defaults, click the 'Reset' button at the bottom center.
Check out our short tutorial video below to see the 'Event List' in action!