The Worksheet: Managing Sections & Line Items
Adjusting your line items on the Design Worksheet is super simple. This allows you to clear out the extra line items and focus on what your client wants.
Before we get started, if you're tired of adjusting line items repeatedly for specific events, you can change them in your Event Defaults. This page allows you to set your preferred worksheet for all new clients. To learn how to do this, check out this article: How do I build my Event Default Worksheet? (admin fee, taxes, line items, and fees) Below, learn how to do this for a specific event (the same applies when creating your Event Default).
Special Note: Changes in individual Design Worksheets will not impact any other events!
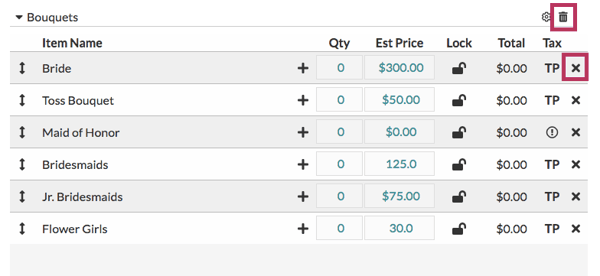
Removing an entire group or individual line item:
- To remove an entire group, click the trash can above the group.
- To remove a line item, click the 'X' to the far right.
- Special Note: if you accidentally delete a group or line item, click 'Edit Worksheet' at the top of the Design Board and then click the 'More' button to see your removed items. Click, hold, and drag to the desired position to restore it. For groups, this is how you change the order.

-1.gif?width=600&name=ezgif.com-gif-maker%20(24)-1.gif)
Renaming category groups or line items:
- To rename your category group and/or line items, hover over the text and click.
- Type in your desired text, then click on a different part of the page.
.gif?width=600&name=ezgif.com-video-to-gif%20(33).gif)
Changing the order of your line items:
- To change the order of your line items, click and hold the up/down arrow icon to the left of the line item name. Drag it to your preferred position.
.gif?width=600&name=ezgif.com-video-to-gif%20(34).gif)
