
The Design Worksheet is an Event Floral Design playground! As a best practice, we recommend filling up your Design Board with anything you might use for your recipes. If you're not sure how to do that, check out the article How do I add/remove photos & ingredients on my Design Board?
Before we get started, we want to share that you are not required to build a recipe for every line item; however, this will give you accurate information like your stem counts. If you're just sending off a quick quote, you can simply fill in the qty and price, add a photo and a description, or build the recipe. What you do may differ depending on the stage of the planning process.
Here are the items you can find in the article below:
- Starting your recipe with a recipe (inspiration) photo or ingredient.
- Adding ingredients to your recipe.
- Changing recipe components (name, stem cost, price, and tax).
- The difference between recipe Description and Notes.
- Adding the ingredient list.
- Changing the recipe photo.
Starting your recipe with a recipe (inspiration) photo or ingredient:
- Make sure you have your images uploaded to your Design Board and ingredients added - this will make it much easier! If you're unsure how to do this, check out How do I add/remove photos & ingredients on my Design Board?
- Click, hold, and drag your image to the '+' sign of the line item. Alternatively, you can click the '+' sign and select your image.
- Once you do either of the above, a recipe template will open.
-2.gif?width=600&height=346&name=ezgif.com-video-to-gif%20(12)-2.gif)
Adding ingredients to your recipe:
- Once the template has opened, you can add ingredients.
- To add one at a time, click, hold, and drag your ingredient into the recipe. You can add anything available in your items gallery.
- To add in bulk, click the 'Add Ingredient' button within the recipe template. A box will pop up with all the items you starred to your Design Board. Click each ingredient and then click off the box. All the items will add to your recipe (this is the most efficient method!)
- Special Note: Do not click '+Add New item' as this is how you would add a brand new item to your resources and the recipe simultaneously!
-2.gif?width=600&height=346&name=ezgif.com-video-to-gif%20(13)-2.gif)
Changing recipe components (name, stem cost, price, and tax):
- To change the recipe name, hover your cursor over the recipe name (above the photo or placeholder) and click. Type in your name. If you plan on saving the recipe, we recommend placing what it is in the name. For example, 'Blush Bridal Bouquet.'

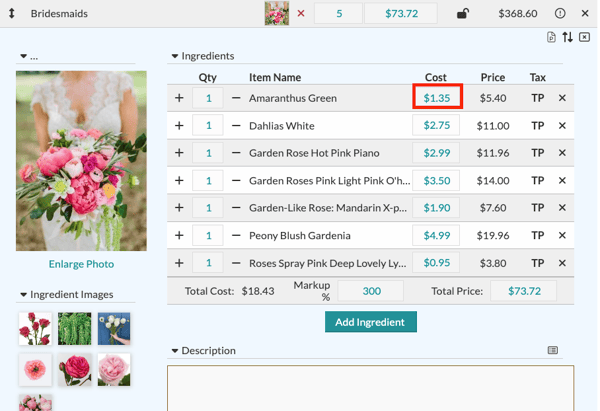
Changing the ingredient cost within the recipe:
- This allows you to adjust the cost of an item for one event. This is helpful if you're anticipating higher stem costs during a Holiday or if your client is purchasing a rental. To do this, click inside the cost box and change it to your new cost. It will update and use that cost within all recipes for that singular event. It will not update it for others.
- Special Notes: If you update markup/cost information, ensure your recipe is unlocked (without a red lock). This will allow the software to recalculate the price.
- If you do not see the 'Cost' column, your privacy mode is on. Click your user icon in the upper-right corner to turn this off.
To update the price (what your client will see on the proposal):
- Click inside the 'Estimated Price' box and type your custom price. It will automatically lock once you hit enter, but you can always unlock it.

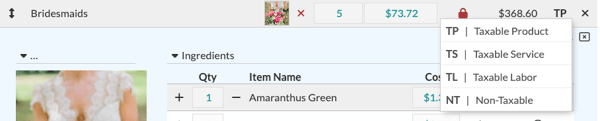
Changing how your line item (or individual ingredient) is taxed:
- To change how Details categorizes the total (price) of your recipe, click the 'TP' once your price is locked in and select one of the other options. TS is Taxable Service, TL is Taxable Labor, and NT is Non-Taxable Product. If you do not charge tax on either of the above, don't worry! If you've adjusted this in your settings, it will apply a 0% tax. If you're unsure if you've done this, check out How do I build my Event Default Worksheet? (admin fee, taxes, line items, and fees)
To change the tax for an individual ingredient:
- First, make sure your recipe price is unlocked.
- Find the specific ingredient, right-click the TP to open the menu, and select your preferred option.
- Special Note: This is an excellent option if you do not charge tax on your rentals!
The difference between recipe Description and Notes:
- The 'Description' section is a place for you to write a beautiful description of your recipe. If you choose to save your recipe, this will save with it. The description shows on the proposal but not the Recipe PDF.
- The 'Notes' section is a place for you to type in any design notes, such as 'photo for inspiration only' or 'Sarah would like the bouquet a bit larger than what's shown in the photo.'
- Notes do not save with the recipe. Notes will show on the Recipe PDF and the Proposal.
Adding the ingredient list:
- Do you want to share the specific blooms you will be using with your client? Add the ingredient list to your Description!
- Click the notepad icon to copy the list to your clipboard.
- Paste into your Description or Notes (both are shown on the proposal, but remember the Description saves with the recipe).

Changing the recipe photo:
- Found another image that suits the recipe better? You can update it directly within the recipe. If you already saved the recipe - make sure you update it!
- Click the recipe image, and a box will pop up that will allow you to upload a new image or choose from your inspiration, Design Board recipe photos, and/or Design Board ingredients.
-Oct-27-2023-08-33-47-2791-PM.gif?width=600&height=346&name=ezgif.com-gif-maker%20(1)-Oct-27-2023-08-33-47-2791-PM.gif)
Recipe Options:
In the top right corner of each recipe, you will see two opposite-facing arrows. This is the Recipe Options menu where you can save recipe to the gallery, favorite them to your design board, and more.
-
New Gallery Recipe - Save this as a new recipe in the Recipe Gallery for use in future events
-
Update Gallery Recipe - Update the existing gallery version with any new changes made
-
Update From Gallery - Revert changes made back to what is saved in the gallery
-
View Gallery Recipe - See the saved gallery version of this recipe
-
Favorite Recipe - Favorite the recipe to your Design Board

To learn more about the 'Worksheet', watch our short walkthrough video below!