
To add a discount, head to the Design Worksheet.
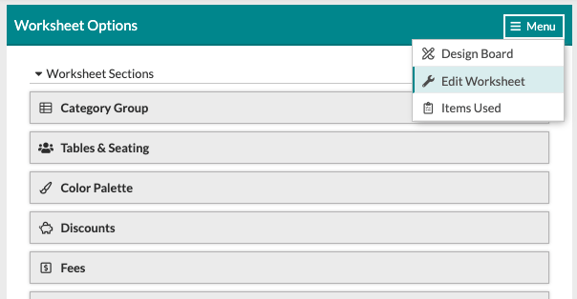
Discounts are applied within a special worksheet section titled 'Discounts'. If it's not already included on your worksheet, follow these steps to add it:- At the top of the Design Board, click 'Edit Worksheet'.
- Click, hold, and drag over a 'Discounts' section to the worksheet.
Or:
- At the bottom of the Worksheet is a blank space that, when hovered over with your mouse, displays a button to 'Add New Section' - click there.
- Select the 'Discounts' worksheet section in the resulting window to add it.
Once you've located or added the 'Discounts' section, follow these steps to create a discount:
- Add a new row (if applicable).
- Enter the discount name by clicking on the title and editing.
- Use the 'Apply To' drop-down menu to determine what and how the discount is applied. These are the available options:

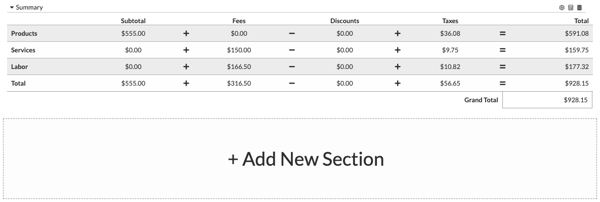
- Products: This will apply the discount to items categorized as products. That includes any line item with 'TP' or 'NT' (for 'Taxable Product' or 'Non-Taxable', respectively) set in the 'Tax' column.
- Services: This will apply the discount to items categorized as services. That includes any line item with 'TS' (for 'Taxable Service') set in the 'Tax' column.
- Labor: This will apply the discount to items categorized as labor. That includes any line item with 'TL' (for 'Taxable Labor') set in the 'Tax' column.
- Event: This will apply evenly to the entire event pre-tax. This is spread out evenly through all charges for the event.
- Total: This will apply evenly to the entire event after tax - a very important distinction because it will be discounting everything, including the taxes. This is applied as a flat discount at the end.
- Use the next drop-down to further determine how items should be discounted.

- Evenly: This option will spread the discount out evenly throughout the selected category. Available to apply to all options except for the 'Total'.
- Taxable First: Selecting this option will apply with priority to taxable items first. For example, if you have line items marked with 'TP' and others marked with 'NT', then selecting this option will focus on the 'Taxable Product' before the 'Non-Taxable' lines.
- Non-Taxable First: Selecting this option will apply with priority to non-taxable items first. For example, if you have line items marked with 'NT' and others marked with 'TP', then selecting this option will focus on the 'Non-Taxable' lines before the 'Taxable Product' lines.
- Tax Calculated First: This is the default (and only) option if you select a 'Total' discount. Essentially, this is just an indicator so that you know that this discount will be applied after tax.
- Next, select the 'Type', being a flat amount or a percentage-based discount.

- Enter the applicable dollar amount or percentage, depending on the type.
- That's it - you're done!
