
Gallery Home
Items are grouped into Collections within the Item Gallery. By default, you will have an 'All Items' and a 'My Items' collection, as well as any collections from our Details partners. The All Items collection will contain any item in your gallery. Think of it as the master list of items. The My Items collection will contain any items you've added or edited.
This is what the Item Gallery looks like:

To access a collection and its items, click on the tile itself. This will open the collection where you can view and edit the items within.
Search & Filters
Search by keyword or filter by item type, color, and availability. Navigate the Search & Filters panel using the 'More' buttons at the top or bottom of the panel.- Search by Name: Enter a keyword or full item name.
- Search by Type: Check any of the boxes for item types you would like to view.
- Search by Color: Select a color from the ones shown, enter a color code, or click the palette icon to use the Color Palette tool to find a color. You can also adjust the color match threshold by clicking '+ Advanced' and dragging the dot closer or farther away on the line.
- Search by Availability: Click the calendar icon to select a date with the Date Picker tool.
- Search By Custom Properties: Add the Name, Condition, and Value of your saved property
- Search By Tag: Type the tag and click Add. You can add multiple tags to one search.

Adding a New Collection
The Collections feature is a great organizational tool. You can create and completely customize your collections to suit your needs.
To create a Collection, follow these steps:
- Start by clicking the 'Add New' button in the top-right corner, and select 'New Collection'
- The New Collection modal will appear in the center of the screen, and you should begin by filling in the Title and Description fields.
- Optionally, you can set a background image or color for the new Collection. Use the Background drop-down to select one of the options, and then either select your color using the Color Palette tool or upload an image!
- Optionally, you can choose to hide or display the Title.
- When you're done, click 'Add Collection' to complete the setup!

-Jun-24-2021-06-09-28-60-PM.gif?width=600&name=ezgif.com-gif-maker%20(3)-Jun-24-2021-06-09-28-60-PM.gif)
Check out this GIF for an example of the steps outlined above. You can also add Sub-Collections by repeating these steps within any Collection.
Navigating Between Collections
To quickly navigate between various Collections or return to the Gallery Home, use the icon in the top-left corner of the Collections board, which resembles an open book.

Click on the menu and then select your destination. Use this menu to get around the Item Gallery!
Adding Items to Collections
Once you've created a Collection, it's time to add items!
This is typically done by copying or cutting items to the clipboard. Once you've selected the items you want, the clipboard will open, and you can then use the navigation tool (as seen above) to get to the Collection you want to paste into.
Note: You cannot 'cut' an item from the All Items or My Items Collections.
There are several ways to approach this. You can right-click on a single item and select 'Copy' to put it on the Clipboard, or you can select multiple items at once using Selection Mode (ooh, ahh).
-4.gif?width=600&name=ezgif.com-gif-maker%20(3)-4.gif)
Re-Ordering Collections
To reorder your Item Gallery collections, click the icon in the upper-right corner that resembles four arrows pointing in either direction. Hold the icon and drag-and-drop to re-order the collections.

Selection Mode
To access Selection Mode, click the 'Options' button in the bottom-center of the screen and click the 'Selection Mode' option. Then, you can click on any of the items you want or click and drag to select all the items within your path.
-Mar-24-2021-02-12-50-79-PM.gif?width=600&name=ezgif.com-gif-maker%20(4)-Mar-24-2021-02-12-50-79-PM.gif)
Once you've selected the items you want, click 'Copy' or 'Cut' at the bottom-center of the screen to move those items to the clipboard. If you change your mind and want to start over with your selections, click 'Cancel.'

Note: If you 'cut' something from a collection, it will no longer be located in the area you selected it from.
The Clipboard
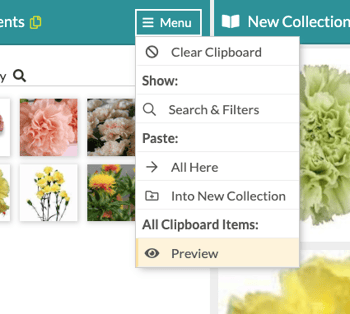
Once items have been copied or cut to the clipboard, you can paste them into any collection you want! The Search & Filters panel on the left side will turn into the Clipboard so you can see what you've selected, and if you want to switch back and forth between the search options and your selected items, you'll use the 'Menu' button in the top-right of that panel to navigate.
Once you have what you want, simply navigate to the collection you want to drop the items into and click 'Paste' at the bottom center to complete.
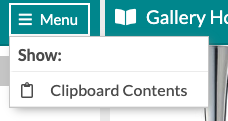
Clearing & Previewing the Clipboard
Once your Clipboard is full, you can preview all the items you selected in a full view. Alternatively, you can clear the board of any selections you've made.
Both options are found under the 'Menu' button in the top-right of the Clipboard panel.
Items
The items have two separate views: the Item Modal and the Item Details. The first is a quick view and edit window; the other is a full item page filled with customization options.
Note: For those curious, a 'modal' is a small window that opens over the main window.
The Item Modal
Within any Item Gallery collection, you can use the 'Add New' button in the top right corner to add a 'New Item.' The item editor will allow you to edit a variety of information for the item including:
|
|
|
The information you associate with an item can be used later to help you search for products based on those attributes. Some fields will change dynamically depending on the item type you select.
For example, choosing Blooms & Greenery displays fields for stems per bunch and a default per-stem cost. Selecting Vases & Rentals, on the other hand, provides an option to add a rental price and reveals the Inventory section. The Inventory section enables you to track the location of your inventory and the quantity of each item at each location.
-2.gif?width=600&height=373&name=ezgif.com-animated-gif-maker%20(2)-2.gif)
The Item Details
Take a look at this full-page, detailed view of an item - we will walk through each panel, one at a time.
- Images: Multiple images can be uploaded to a single item. You'll see them all displayed, but there will be one featured image. You can use the pencil icon in the top-right of the Images tile to edit the images, re-ordering or deleting. To upload additional images to an item, click the plus icon in the top-right of the tile and select the images you want to upload from your computer or enter a URL to the image.
-Jun-24-2021-08-18-50-08-PM.gif?width=600&name=ezgif.com-gif-maker%20(4)-Jun-24-2021-08-18-50-08-PM.gif)
- Tags: Enter short descriptors as tags by clicking the tag icon in the top right corner of the corresponding tile and then typing in the phrase you want to append to the item. To remove tags, click the trashcan icon and click the 'X' on the tags you'd like to delete.
- Name & Description: Edit the Name and Description fields by clicking the pencil icon in the top-right of the corresponding tile (top-center). Click 'Save' to complete.
- Colors: Use the color palette to add colors to an item; the colors can then be used as search parameters. There is a tool here as well that allows you to assign the colors automatically based on a scan of the selected image on the Images tile. Click the small picture icon in the top-right of the Colors tile and prominent colors from the image will be selected. Remove colors by clicking the trashcan icon in the top-right of a color tile.
-1.gif?width=600&name=ezgif.com-video-to-gif%20(12)-1.gif)
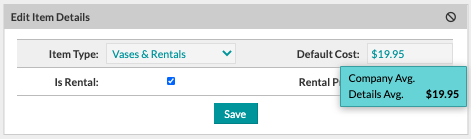
- Item Details: Adjust the cost and inventory fields by clicking the pencil icon in the top-right corner of this tile. Click 'Save' to complete.
- Availability: Set the item availability by clicking the pencil icon in the top-right corner of the tile. Select entire months by checking the boxes for the desired months, or set a specific date range by clicking 'Add Date Range,' selecting the start and end dates, and then clicking 'Add Range.' Click 'Save' to complete.
- Custom Properties: Set any custom properties that you want! This tile is fairly open-ended, so get creative. Examples might be product SKUs or ID numbers or the height, weight, or length of a particular item. Enter a property name, select whether the property is a text or numeric type, set the property value, and select whether or not you want to be able to search by that property. Click 'Save' to complete.
-1.gif?width=600&name=ezgif.com-video-to-gif%20(13)-1.gif)
- Order History: Here, we'll see a comprehensive list of each event this item was used in, with a specific focus on information that was entered into the 'Costs' page of the event. So, the data being displayed here will reflect what was purchased and how much it was purchased for, according to your own record.

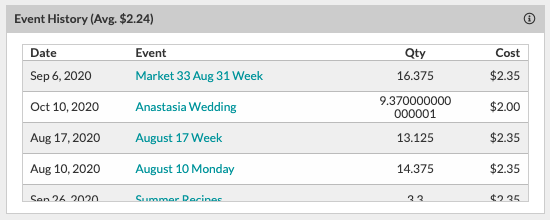
- Event History: Here, we'll see a comprehensive list of each event this item was used in, with a specific focus on information that was entered into the Worksheet for each event. So, the data being displayed here will reflect what estimated costs have been for this item historically, according to your own record.
- Adjusting Costs: If you change the item cost set in your gallery, you'll see the average Order History displayed directly beneath the item in the form of the 'Company Avg.' amount.
- If this item is partner-managed (i.e., it's from the Accent Decor collection), there will also be a 'Details Avg.' field displayed to let you know what other Details users are typically pricing these items at.
The Item Gallery & the Design Board
When you're in an event, you will have some additional functionality as it applies to the Design Board and how items are added or removed. All tools to search, filter, create collections, and edit items are the same as above, but there are additional navigation and selection options. Let's touch on these important updates.
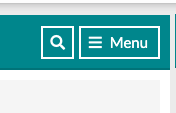
Accessing the Clipboard and/or the Search & Filter Panels
Click the 'Menu' button in the top-right of the 'Search & Filer' panel to navigate to the 'Clipboard.'
Once on the clipboard, click the magnifying glass icon to return to the 'Search and Filter' panel.
Selection Mode to Favorite Items
Selection Mode is accessed and utilized the same way as previously mentioned but includes the additional options to add selected items to your favorites (i.e., pin to the Design Board). Use Selection mode to highlight the items you want to add to the Design Board and then click 'More' at the bottom-center of the screen and select 'Add to Favorites' to complete.
Alternatively, you can cut or copy the items to the Clipboard and then those selected items to your favorites. This is done using the same steps to cut/copy that were previously outlined, and then you'll open the menu on the Clipboard to select the 'Add To Favorites' option.
'All Favorites Items' Options
If you'd like to use the items from your Design Board to create a new collection or to add to an existing collection, you can! Both options to complete these actions are found under the Design Board menu. 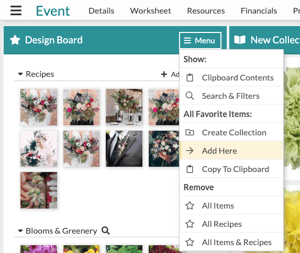
- Create Collection: Navigate to where you want a new Collection featuring your Design Board items to live, open the menu, and select 'Create Collection.' An unnamed collection will be generated, which you can customize by selecting the pencil icon in the top-right corner.
- Add Here: Navigate to the Collection you would like to add your Design Board items to, open the menu, and select 'Add Here.'
Removing Design Board Content
Rather than navigating back to a gallery to unselect, you can open the menu and use any of the 'Remove' options or click the 'X' in the top-right corner of an item or recipe thumbnail tile.

Support
We know there's a lot to take in, but don’t worry—we're here for you! If you need any assistance, please don't hesitate to contact us via Support Chat, our Contact Us form, email at support@detailsflowers.com, or call us at (386) 255-9594.