The Item Gallery: Item Details
There is a full-page view of each item, learn about it below!
The Item Details
When you first access the detailed view of an item, you'll see a lot of the same fields that exist for items already (and that exist in the Item Modal), but there are a few new ones and some expanded functionality to existing ones.
We're going to walk through each panel, one at a time.
- Images: Multiple images can be uploaded to a single item. You'll see them all displayed, but there will be one featured image. You can use the pencil icon in the top-right of the Images tile to edit the images; re-ordering or deleting.
-Jun-24-2021-08-18-50-08-PM.gif?width=600&name=ezgif.com-gif-maker%20(4)-Jun-24-2021-08-18-50-08-PM.gif)
To upload additional images to an item, click the plus icon in the top-right of the tile and select the images you want to upload from your computer or enter a URL to the image. - Tags: Enter short descriptors as tags by clicking the tag icon in the top right corner of the corresponding tile and then typing in the phrase you want to append to the item. To remove tags, click the trashcan icon and click the 'X' on the tags you'd like to delete.
- Name & Description: Edit the Name and Description fields by clicking the pencil icon in the top-right of the corresponding tile (top-center). Click 'Save' to complete.
- Colors: Use the color palette to add colors to an item; the colors can then be used as search parameters. There is a new tool here as well that allows you to assign the colors automatically based on a scan of the selected image on the Images tile. Click the small picture icon in the top-right of the Colors tile and prominent colors from the image will be selected.
-1.gif?width=600&name=ezgif.com-video-to-gif%20(12)-1.gif) Remove colors by clicking the trashcan icon in the top-right of a color tile.
Remove colors by clicking the trashcan icon in the top-right of a color tile. - Item Details: Adjust the cost and inventory fields by clicking the pencil icon in the top-right corner of this tile. Click 'Save' to complete.
- Availability: Set the item availability by clicking the pencil icon in the top-right corner of the tile. Select entire months by checking the boxes for the desired months, or set a specific date range by clicking 'Add Date Range', selecting the start and end dates, and then clicking 'Add Range'. Click 'Save' to complete.
- Custom Properties: Set any custom properties that you want! This tile is fairly open-ended, so get creative. Examples might be product SKUs or ID numbers or the height, weight, or length of a particular item. Enter a property name, select whether the property is a text or numeric type, set the property value, and select whether or not you want to be able to search by that property. Click 'Save' to complete.
-1.gif?width=600&name=ezgif.com-video-to-gif%20(13)-1.gif)
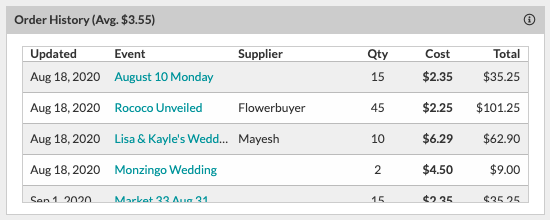
- Order History: Here, we'll see a comprehensive list of each event this item was used in, with a specific focus on information entered into the 'Costs' page of the event. So, the data being displayed here will reflect what was purchased and how much it was purchased for, according to your record.

-
Event History: Here, we'll see a comprehensive list of each event this item was used in, with a specific focus on information that was entered into the Worksheet for each event. So, the data displayed here will reflect what estimated costs have been for this item historically, according to your record.

-
Adjusting Costs: If you change the item cost set in your gallery, you'll see the average Order History displayed directly beneath the item in the form of the 'Company Avg.' amount.

If this item is partner-managed (i.e., it's from the Accent Decor collection), there will also be a 'Details Avg.' field displayed to let you know what other Details users are typically pricing these items at.

